RabbitMQ connection - Tutorial
|
Last Update: 2018 |
This tutorial describes the use of profiles as AMQP clients (we don't provide a server). An external AMQP server must be available. Note: AMQP messages are not to be confused with the internal Lobster message type "Message". The principle is similar, but the latter is an internal and proprietary message format.
For this tutorial, we will install an AMQP server (RabbitMQ) on a Windows system and create two profiles to receive and send AMQP messages.
Currently, AMQP protocol versions 0.9.1 and 1.0 are supported.
Installation of RabbitMQ and Erlang
Please go to website http://www.rabbitmq.com/install-windows.html (links for other operating systems are available). First, you have to download and install Erlang. Then download the installer for the RabbitMQ server (this tutorial used version 3.4.3) and execute it. This will install a RabbitMQ server service. The service will already be running after the installation and you can use the default setting for the purpose of this tutorial.
Activate management plugin

The RabbitMQ server provides a web interface for the management of the server, as you might be familiar to from similar systems. However, you have to enable the management plugin first. Have a look at website http://www.rabbitmq.com/management.html. Open a Windows command console, navigate to folder "RabbitMQ Server/rabbitmq_server-3.4.3/sbin/", and execute the command "rabbitmq-plugins enable rabbitmq_management".
If you have done everything correctly, you will be able to call the website "http://localhost:15672/". The default login and password are guest/guest. You will see a web page as shown in the screenshot above.
Create queue
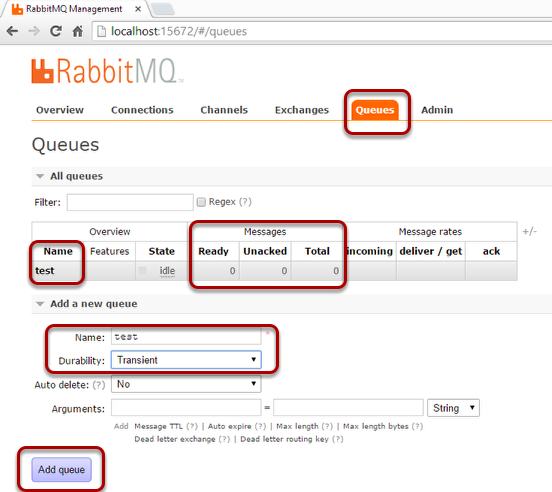
Next, we will create a queue with the name "test". Please use the settings shown in the screenshot above.
Manually publish message
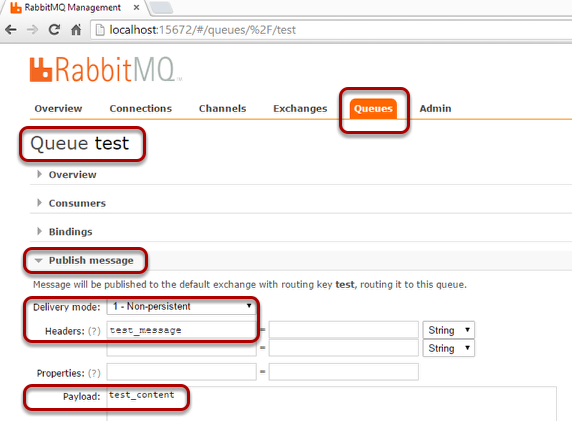
Since we do not have any messages in the new queue yet, we will use the management interface to manually publish a message to this queue. Please proceed as shown in the screenshot above.
Creating AMQP alias
For the creation of an AMQP alias see section AMQP Connections.
To keep things easy, we will only use a few parameters.

Creating profile with "AMQP" Input Agent
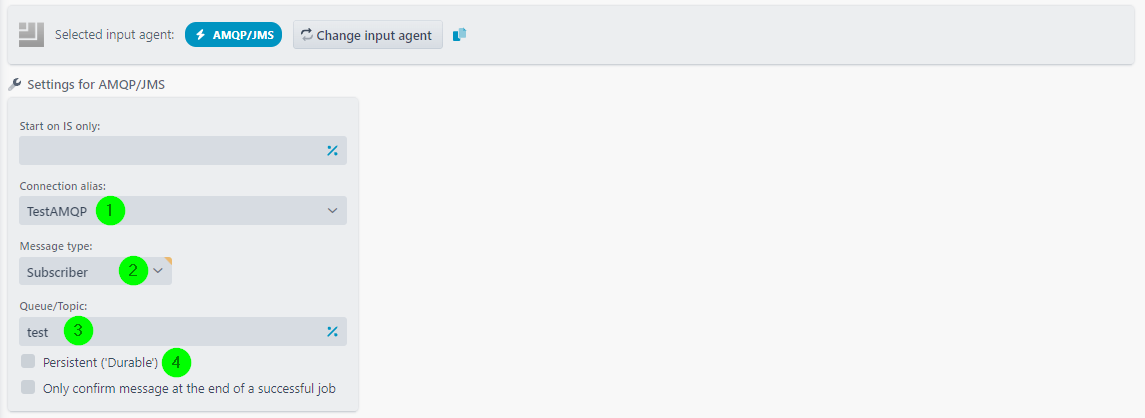
Now create a new profile with an Input Agent of type "AMQP". Please use the setting shown in the screenshot above. You can use the option "No mapping" (page "Main settings") and leave the Responses empty. Save the profile and make sure it is active. At the latest after a restart of the Integration Server, the connection to the AMQP server will be established and our profile will listen to queue "test" as a consumer.
The parameters
(1) The alias you have set up.
(2) Selection of the message type: "Subscriber", "Topic", "Routing", "RPC". Style "RPC" is synchronous, the others are asynchronous. Details regarding the different styles can be found in the tutorials at https://www.rabbitmq.com/getstarted.html. In our case, we use "Subscriber".
(3) Name of the queue. In our case "test".
(4) The option "Persistent" in an AMQP input agent is necessary if you want to receive messages from a durable queue. Since we created a transient queue in our example, we do not need this option. Details can be found at https://www.rabbitmq.com/tutorials/amqp-concepts.html in section "Queues".
New consumer for test queue
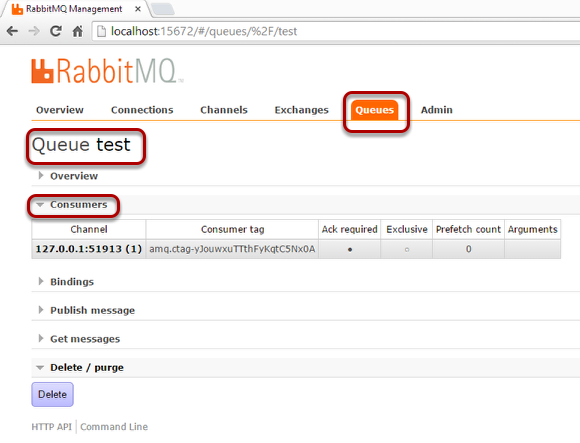
If you have set everything correctly, you will get a view like the one shown in the screenshot above in your management web interface. You will see our profile in the form of a new consumer for the queue "test". If you cannot see a consumer, the establishment of a connection has failed. See section "Connection Error" below.
Successful profile in Control Center
If the connection has been established and the profile was executed and received the message from queue "test", you will find a job in the Control Center. You can view the file (and of course manipulate it in your profile) in the usual manner.
Creating profile with "AMQP" Response

To be able to send messages to our queue "test", we have to create another profile. You can build a small mapping or simply manually upload a text file, use option "No mapping" (page "Main settings"), and send the file "as received" (phase 6). The only important thing for our example is the Response. Please set it as shown in the screenshot above. If the connection has been established and your message has been published to the queue "test", you will again be able to confirm that in the management web interface and the Control Center. If you are not able to find your message, see chapter "Connection Error" below.
The parameters
(1) The alias you have set up.
(2) Selection of the type: "Publish", "Routing", "Topic" or "RPC". Style "RPC" is synchronous, the others are asynchronous. Details regarding the different styles can be found in the tutorials at 'https://www.rabbitmq.com/getstarted.html'. In our case, we use "Publish".
(3) Name of the queue. In our case "test".
(4) The option "Persistent" in a Response of type "AMQP" is necessary if you want to send persistent messages to a durable queue. Since we created a transient queue in our example, we do not need this option. Details can be found at https://www.rabbitmq.com/tutorials/amqp-concepts.html in section "Queues".
Connection error
To investigate a connection error, please open file ./logs/services/error.log.
One possible connection error would result from trying to receive messages from a durable queue, without choosing option "Persistent" in your "AMQP" Input Agent. This would lead to an error message like the following.
16:51:23 SYSTEM:DATAWIZARD:AMQP [AMQP Listener@AMQP] Exception in binding to AMQP queue, retrying in background: java.io.IOException at com.rabbitmq.client.impl.AMQChannel.wrap(AMQChannel.java:106) ... Caused by: com.rabbitmq.client.ShutdownSignalException: channel error; reason: {#method<channel.close> (reply-code=406, reply-text=PRECONDITION_FAILED - inequivalent arg 'durable' for queue 'test' in vhost '/': received 'false' but current is 'true', class-id=50, method-id=10), null, ""} ...Of course, it is possible that your AMQP service is simply not running. This would produce an error message like the following.
18:30:33 SYSTEM:DATAWIZARD:AMQPMANAGER Unable to connect to AMQP server with alias 'TestAMQP', retrying in background: java.net.SocketTimeoutException: connect timed out at java.net.DualStackPlainSocketImpl.waitForConnect(Native Method) at java.net.DualStackPlainSocketImpl.socketConnect(DualStackPlainSocketImpl.java:85) at java.net.AbstractPlainSocketImpl.doConnect(AbstractPlainSocketImpl.java:339) at java.net.AbstractPlainSocketImpl.connectToAddress(AbstractPlainSocketImpl.java:200) at java.net.AbstractPlainSocketImpl.connect(AbstractPlainSocketImpl.java:182) at java.net.PlainSocketImpl.connect(PlainSocketImpl.java:172) at java.net.SocksSocketImpl.connect(SocksSocketImpl.java:392) at java.net.Socket.connect(Socket.java:579) ...